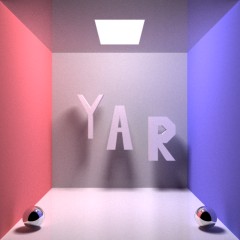

Yar is a raytracer. It renders images of 3D scenes, using one of several different raytracing schemes. The 3D scene can be previewed in real time using OpenGL, then rendered and saved to a Windows bitmap. To see examples of renderings created with Yar, visit the gallery
Yar renders scenes stored in a YAR file format, a simple text format based on the OFF files that Yar uses for triangle mesh input. The YAR file contains a list of materials and a list of objects. The materials are defined in separate files, with the extension YMT. Objects are also stored in separate files, while the YAR file indicates what position and orientation each object has in the scene.
Yar should be relatively straight-forward to use. The various menu items and controls are briefly described below.
Download Yar (61KB zip file)
Yar loads YAR files, as described in the YAR format documentation. To open such a file, use File->Open.
Yar supports exporting the rendered image to a Windows bitmap (BMP) file. This option is available on the Export menu.
Interaction with Yar consists primarily of adjusting the current view of the scene and is done mostly with the mouse. The normal method of viewing is orbital. To move the camera around the object, hold the left mouse button and move the mouse. To zoom in, hold the right mouse button and move the mouse up or use the keypad '+' key. To zoom out, hold the right mouse button and move the mouse down or use the keypad '-' key.
An alternate method of viewing is available. To toggle between the normal method and the Free Camera method, you can use the View->Viewing menu or the C key. While viewing with the Free Camera method the mouse controls change. To look in a different direction, hold the left mouse button and move the mouse. To move the camera forward in the direction that it is pointing, hold the right mouse button and move the mouse up. To move the camera backward, hold the right mouse button and move the mouse down.
After using the Free Camera method of camera control you may find that you want to look back toward the scene. You can point the camera at the center of the scene with the View->Viewing->Look At Center menu option.
If you need to recreate an exact viewing situation you can use the Viewing Properties dialog, accessible from View->Viewing->Set. This dialog displays the current At and From points of the camera, the Up vector, the near and far planes, and the field of view. You may change any of these numerically with this dialog. Note that except for the field of view, all of these parameters are modified by interactively changing the camera. To recreate an exact scene, position the camera approximately where desired interactively, then pick and set easily reproducible (whole number) values in the dialog. Once you are happy with the set values, write them down for later use.
Yar has four different viewing modes. The viewing mode is selected from the View menu. Not all viewing modes are available at all times. The viewing modes are:
Yar supports five different basic types of rendering an image. Each of these are available from the Render menu. Options that modify how the rendering proceeds are available on the Tools->Options dialog. After a rendering has completed information about the rendering time and image size is available on the View->Rendering Statistics dialog. Each of the five types of rendering is described below, then the rendering options from Tools->Options are explained. The two rendering types that depend on a photon map require that you build a photon map (Tools->Build Photon Map) or load a previously saved photon map (Tools->Load Photon Map) before use. Note that using a previously saved photon map from a different scene will give wrong (But possibly artistically interesting) results.
A raycast rendering sends rays from the eye into the image through each pixel, and uses the color computed on the first object hit as the final color. This means shiny objects will appear black instead of reflecting other objects.
A raytraced rendering sends rays from the eye into the image through each pixel, then continues the ray through the scene, accumulating color as it bounces off of objects. The ray continues until either a maximum number of bounces is reached, the resulting color would not contribute above a certain threshold to the final pixel color, or the ray does not hit an object.
A Monte Carlo raytraced rendering again sends rays into the image through each pixel, but the method of bouncing differs. Shiny objects will reflect the ray predictably, but matte objects will bounce the ray in some random direction. This method randomly samples the full illumination of the scene. In order to get a high-quality image using this method, many rays per pixel must be averaged together (The number of rays to use is a rendering option).
A direct photon map rendering uses the photon map to calculate the color of each object when the ray hits it. Rays are never bounced, and no shadow rays are used. This method can give good results when there are no shiny objects in the scene, and the photon map contains enough photons.
A raytraced photon map rendering is similar to Monte Carlo raytracing, but colors for diffuse rays are calculated using the photon map, after the first bounce. Like Monte Carlo raytracing, many rays per pixel must be used to avoid a noisy image.
The rendering options dialog available from the Tools->Options dialog allows configuration of a large number of parameters for the rendering process. These are grouped into four categories; Raycasting, Raytracing, Photon Map, and Irradiance Estimate. These categories roughly correspond to the types of rendering. The categories are also cumulative: raycasting options will affect raytracing, and raytracing options will affect photon map results.
The raycasting options govern how rays are cast into the scene. If Use hardware for first ray is checked, OpenGL's z-buffer will be used to determine the object that the first ray hits. This will be somewhat faster than calculating the object manually, but is not as accurate. For test renders, leave it checked, and for final renders, uncheck it.
The Rays Per Pixel determines how many rays are shot through each pixel. The colors computed for each of these rays are then added up and divided by this number, giving an average color for rays passing through that pixel. For random sampling methods such as soft shadows or Monte Carlo raytracing, this number needs to be set higher. For quick previews, set it to 1.
If Use Jittering is checked, rays will be sent through a randomly selected sub-region of the pixel, rather than the center of the pixel. This will lead to higher quality results when using more than one ray per pixel. The Jittering Grid Size determines how the pixel is broken up. The default value of 3 indicates that the pixel is broken up into 9 evenly sized sub-regions, arranged in a 3 x 3 grid. One of these sub-regions is randomly selected for a ray, then a random location within that sub-region is picked for the ray to actually pass through. This stratifies the random selection, and gives higher quality results. To send rays through purely random locations in the pixel, use a grid size of 1.
The raytracing options govern how rays are used in rendering. The Maximum Ray Bounces and Attenuation Threshold options control when a recursive raytrace stops. A ray will not be traced any further through the scene if it has bounced more than the allowed number of bounces, or if its contribution to the final pixel color will be less than the attenuation threshold. Note that setting Maximum Ray Bounces to 0 will cause raytracing options to act like raycasting. In general, Maximum Ray Bounces is the number of different objects that can affect each other's color. The default attenuation threshold is set to 0.0039, which is roughly 1/256. Because the pixel must be represented using RGB color values between 0 and 255, changes smaller than this amount will have very little effect on the resulting pixel color. A larger value for this option would cause rays to terminate more quickly, which could give shorter rendering times.
Shadows are computed in raytracing by casting a shadow ray to the light. If that ray intersects a second object before it reaches the light, then the light does not contribute directly to the illumination of the object. If Soft Shadows is checked, Yar does shadow ray checking to random spots on the light. If the option is not checked, Yar sends a shadow ray to the center of each light triangle. This will give hard shadow edges at the points where the center of the light can not be seen from the object in question. When Soft Shadows is checked, the Shadow Rays parameter indicates how many shadow rays should be randomly sent toward the light, every time a ray hits an object. The effect of these shadow rays is averaged together. If you are sending many rays per pixel, you can set this to 1 shadow ray, and allow the averaging to be done in the rays per pixel averaging. If you are sending only one ray per pixel and you want soft shadows, you will need to set this to a higher number of shadow rays.
The Total Photons setting controls how many photons are generated in the photon map. This does not directly affect rendering, but the photon map size affects the Direct Photon Map and Raytraced Photon Map rendering options.
The irradiance estimate is what is calculated from the photon map when a ray hits an object. It is an estimate of how much total light is arriving at that point, based on the density and power of photons in that region. The Radius is the maximum distance from the point of intersection to look for photons. This is highly dependent on the scale of your scene, and you should test different values. Smaller values give more accurate estimates, but require more photons. The Photons parameter is the maximum number of photons to use in a given estimate. To calculate an estimate, Yar will look for the closest n photons within r, where n is Photons and r is Radius. If there are not enough photons near the intersection point, the estimate will be poor.