Vorpal is a 3D modeling tool. It uses volumetric techniques to create 3D models that are easily rapid-prototyped. These techniques ensure that certain basic properties such as being water-tight are automatically met, freeing the model creator from the micromanagement of these technical details.
Vorpal is designed to be user-friendly and intuitive. Models are created by adding and removing material from a workspace, in a manner related to working with clay. The manipulation of the material and workspace is done primarily with the mouse, allowing the model creator to drag and tweak without worrying about the underlying mathematics. If the creator needs more precise control, dialog boxes allow exact positioning within the workspace.
Vorpal has a one-step Undo feature, allowing the model creator to experiment with most features and return to the un-modified model if the results are not as desired. Vorpal can also easily revert to the last saved version of the model if one-step Undo at a time does not provide enough history depth.
Vorpal has its own file format to store its workspaces in a highly compressed form, but can easily output standard Rapid-Prototyping STL files when the model is complete. These files can also be imported into other modeling programs for finishing touches or combination with existing models.
Download Vorpal (58KB zip file)
Interacting with Vorpal consists of interacting with four basic elements: The View, the Workspace, the Brush, and the Selection. Each of these elements has its own menu. The View controls how the model you are creating is displayed on the screen. The Workspace is the region of space within which you are creating your model. The Brush is the tool you use to modify the contents of the Workspace. The Selection is the region of the Workspace that is available for modification at any given time. Each of these elements is described in turn below.
The View is the way that you are looking at the model. You control the View primarily with the mouse. The View can be considered a camera that moves around an object of interest, orbiting it. Controlling the View easily is important, because attempting to work on a model that you cannot see clearly is difficult and frustrating at best.
Mouse Control Commands
By default the object of interest for the View is the Workspace. When you are working on a smaller region, you may want to change this. You can set the object of interest to the Brush (Shift+B or View->Look At->Brush) or to the Selection (Shift+S or View->Look At->Selection). When you want to return to the full Workspace, you can use Shift+W or View->Look At->Workspace.
If you have found just the right position to look at your model from, you may want to save that View. There are three View positions that you can save at any point and return to at a later point. These positions are accessed with the View menu or with the number keys 1, 2, and 3 (Or ctrl+number to save to that position). There is a fourth view position that you cannot save, but you can return to at any time. This is the default position, which can be accessed from the View->Move View menu or with the Home key.
|
It can be easy to get confused with respect to orientation when moving around your model. By selecting the View->Axes menu option you can display axes near the lower, back, left corner of the Workspace, as shown here. The three arrows are labeled and point in the direction of the corresponding axis. To remove the axes, select the menu option again. |
|
The Workspace is where you will build your model. When Vorpal is first started, there is no current Workspace. To create a Workspace, select New from the File menu. You will be asked how large a Workspace to create. The dimensions of the Workspace determine the level of detail that you will be able to create. It is best to start with smaller Workspaces until you are comfortable with Vorpal. The larger the Workspace the faster and more powerful a computer you will need to work with it.
Once you have created a Workspace you will normally not need to change it. However, on some occasions may want to change the orientation or size of the Workspace. This can be done through the Workspace menu. Reflections occur along the axis you choose, and invert the workspace. Rotations occur around the axis you choose, and rotate 90 degrees in a counter-clockwise direction at a time. Between repeated reflections and/or rotations, you should be able to re-orient your workspace in any direction you choose. If you resize the Workspace, your entire model within the Workspace will be resized as well. This operation is similar to resizing images in a paint program. Increasing the size of the model by resizing the Workspace will cause the model to look blocky and sharp. Reducing the size will remove fine details and blur the model. Unless you are deliberately trying for one of these effects, you should try to avoid resizing the Workspace. Because of the complex nature of these operations they cannot be undone with the Undo option on the Edit menu. Instead, you should save your Workspace before resizing, reflecting, or rotating it and choose Revert from the File menu if you are unhappy with the results.
When you have finished a model you will want to export it to another file format. You can export the model in the current workspace with the Export submenu on the File menu. You may export the model to a binary STL file, readable by most rapid-prototyping machines, or to an OFF file, readable by my RoffView tool and its related OFF tools.
The Brush is the tool you use to create your model. A Brush is essentially a smaller Workspace, which can be positioned within your Workspace. There are tools for creating special geometric Brushes, or any VPL file can be used as a Brush. You can change the contents of the Workspace by Adding or Subtracting the Brush to or from the Workspace. These operations could be compared to adding clay to a model or carving stone from a statue.
You can create a Brush using the Create Brush sub-menu of the Brush menu. When you create a brush in this fashion you are asked for the size of the Brush to create. Once you have chosen this size, just as you chose the size for the Workspace, the Brush is created and positioned in the Workspace. The types of Brushes you can create in this way are:
|
You can also create a Brush by loading a VPL file using the Load Brush option on the Brush menu. Any valid VPL file can be used as a Brush, although chosing one that is larger than your current Workspace is rarely useful. A third and final way of creating a Brush is by using the Cut or Copy tools on the Edit menu. This method is covered below under the description of the Selection element, which determines the region to be Cut or Copied. |
A model built by combining each of the four basic brushes. |
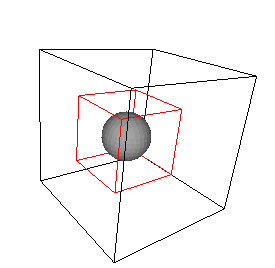
Once you have a Brush, you need to be able to position it within the Workspace. The easiest way to do this is by using the mouse or keyboard. To start moving the Brush interactively you must activate the Brush. To do this you may either select Brush Active from the Brush menu or hit the B key. When the Brush is active its bounding box is displayed in a different color and guide squares are shown on the closest faces of the Workspace so that you can determine the Brush's relative position in the Workspace. While the Brush is active, the following controls apply:
You can return to moving the View by again selecting Brush Active from the Brush menu or hitting the B key. You will frequently need to switch back and forth several times to find different viewpoints that allow you to see exactly where the Brush is and how it is aligned.
|
|
|
When a Brush is loaded, active or inactive, the position of the Brush is shown in the Status bar at the bottom of the window. This allows you to line up elements for exact positioning. If you know the precise location of the Brush that you want you can select Brush->Position Brush->Pick Position. This will allow you to enter the location of the "zero corner" of the Brush.
Just like the Workspace, you can Rotate, Reflect, or Resize the Brush with the corresponding menu items on the Brush menu. This can be used, for example, to create a cylinder aligned with the x-axis instead of the y-axis aligned one that the brush creation process gives you.
Once you have a Brush created and positioned, you can use it to modify the current model. You can Add (Brush->Add or the A key) it to the Workspace or Subtract (Brush->Subtract or the S key) it from the Workspace. These operations are similar to the Boolean operations offered in many modeling packages, but are not identical. The most obvious difference is that you can Add or Subtract multiple times in the same location and get a different result with each operation. This effect requires some experimentation before you will be comfortable with it, but after time the effect feels very natural.
When finished with a Brush you can clear (Brush->Clear Brush or the C key) it to remove it from display. Be careful not to clear a Brush that you want to use again. If you have a complex Brush built up that you want to use again, you can save it (Brush->Save Brush) to a VPL file and load it again at a future point. Very interesting complex geometry can easily be created in this way.
The Selection allows you to limit your attention to a subset of the current Workspace. Like the Brush, the Selection is a rectangular region of space. Unlike the Brush, the Selection must always be within the Workspace. The Selection is very similar to the 2D selection tools in paint programs, allowing you to mask out a region to modify. When you Add or Subtract a Brush, only portions of the Brush that are within the Selection have any effect.
By default the entire Workspace is selected. This allows the Brush to work anywhere within the Workspace. If you want to select a smaller region of the Workspace you must activate the Selection. This can be done in several ways. The easiest way is to select Selection Active from the Selection menu (or press the Space key). If no region is currently selected this will select the center region of the Workspace and make it active. If a region is currently selected, it will make that region active. A second way to select a region is to select Create Selection from the Selection menu. This will ask you for the size of the region to select and create a Selection of that size. To make it active, you must activate it as above. Finally, you can directly resize the Selection using Selection-> Resize Selection->Pick Size. This has the same effect as Create Selection if there is no current selection.
Once you have a selection, you need to be able to position it. This is done in exactly the same way as the Brush, using the mouse or arrow keys. It is also helpful to be able to resize the Selection quickly. To do this with the mouse activate the Selection then double-click on any of the four faces of the selection that is not facing you. The face will become active. You can then control that face with the mouse or arrow keys, just as you control the entire Selection. To return to having the entire Selection active, double-click anywhere off of the Selection.
Just like the Brush you can position or resize the Selection using similar menu items. Note that these operations do not change the model, they just change the portion of it that is selected. The currently selected region is shown in the status bar at the bottom of the window.
When you are finished with a Selection you can clear the Selection (Selection->Clear Selection or the Escape key). This returns to the default Selection of the entire Workspace.
After reading through the basic features of Vorpal above, you may want to try your hand at creating a simple model. The examples provided give step-by-step instructions for several different chessmen, showing how simple, interesting models can be created quickly and easily.
These features are best explored after getting comfortable with the basics of Vorpal described above. Although they are not necessarily any more complex, they are not as essential and may be easier to understand after having spent some time with the program.
Options on the View menu allow you to toggle the display of the bounding box for the Workspace or for the Brush. If the box gets in your way or makes the screen to complex it can be easily removed. On the same sub-menus the display of the edges of the individual triangles that make up your model can be toggled on or off, depending on your personal preference.
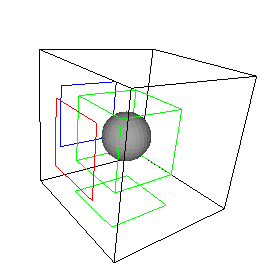
Vorpal supports anaglyph display if you possess red-blue 3D glasses. Toggling this option on the View menu will cause Vorpal to display two slightly different images of the Workspace in two different colors. When viewed through red-blue glasses the display will appear three-dimensional. You may find some types of model creation easier in this mode.
The Filter sub-menu of the Workspace menu allows you to apply one of three different filters to the currently selected region of the Workspace. These filters are:
The Settings sub-menu of the Workspace menu allows you to change the colors of Workspace items. The Material option allows you to select a material from a list to display your model in. This material is a color choice only, and has no effect on the resulting STL file. The Box Color option allows you to select a color for the bounding box of the Workspace, and the Background Color allows you to select a background color. All of these options are saved and restored the next time you run Vorpal. To restore defaults, select the appropriate option on the same sub-menu.
When positioning or resizing the Brush, you can match it to the currently selected area by selecting the appropriate sub-menu items on the Brush menu.
Like the Workspace, the Brush menu has a Settings sub-menu that allows you to change the colors used to display the Brush on the screen.
Similarly to the Brush, when positioning or resizing the Selection you can match it to the current Brush by selecting the appropriate sub-menu items on the Selection menu.
Like the Workspace and the Brush, the Selection menu has a Settings sub-menu that allows you to change the colors used to display the Selection on the screen.
The Workspace Info option on the Tools menu will tell you current size of the Workspace and the number of triangles currently in the model.
You can save a screenshot of the current display directly to a Windows Bitmap (BMP) file with the Save Screenshot option on the Tools menu.
The Options available on the Tools menu allows you to select the type of VPL file that Vorpal saves when you save the Workspace or save a Brush to a file. In most cases there is no reason to change this, but you may if another program reads only a particular type of VPL file.